Measurements: There are many items used to measure objects, and the type of measurements from thickness to weight, length to speed. I learnt how to use the Vernier caliper and micrometer screw gauge in this chapter.Vernier caliper: It is used to measure things accurately to 0.01cm, and can also be used to measure the diameter of spheres. This is what it looks like-

The basic steps are as follows:
1. Preparation to take the measurement, loosen the locking screw and move the slider to check if the vernier scale works properly. Before measuring, do make sure the caliper reads 0 when fully closed. If the reading is not 0, adjust the caliper’s jaws until you get a 0 reading. If you can’t adjust the caliper, you will have to remember to add to subtract the correct offset from your final reading. Clean the measuring surfaces of both vernier caliper and the object, then you can take the measurement.
2. Close the jaws lightly on the item which you want to measure. If you are measuring something round, be sure the axis of the part is perpendicular to the caliper. Namely, make sure you are measuring the full diameter. An ordinary caliper has jaws you can place around an object, and on the other side jaws made to fit inside an object. These secondary jaws are for measuring the inside diameter of an object. Also, a stiff bar extends from the caliper as you open it that can be used to measure depth.
3. How to read the measured value:
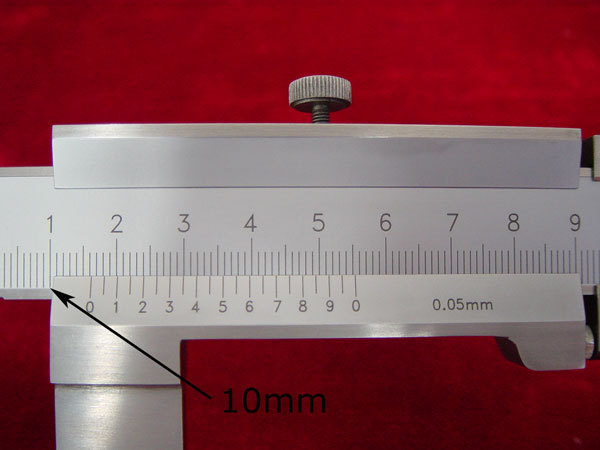
1), Read the centimeter mark on the fixed scale to the left of the 0-mark on the vernier scale. (10mm on the fixed caliper)
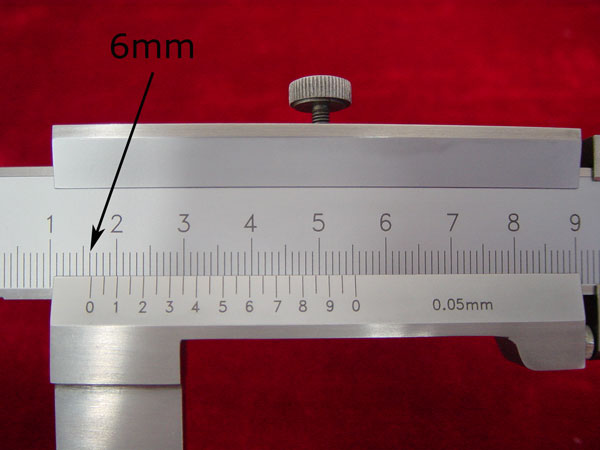
2). Find the millimeter mark on the fixed scale that is just to the left of the 0-mark on the vernier scale. (6mm on the fixed caliper)
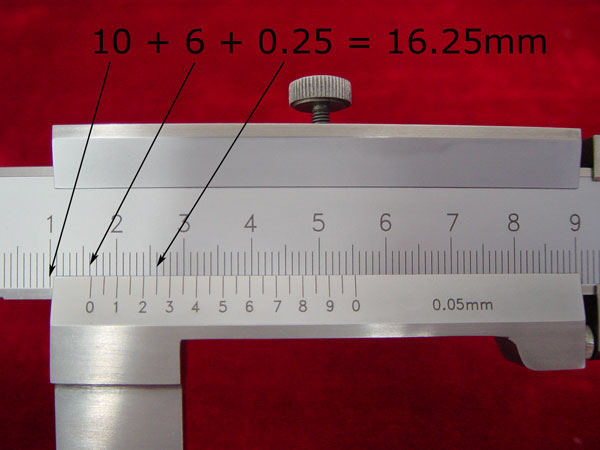
3). Look along the ten marks on the vernier scale and the millimeter marks on the adjacent fixed scale, until you find the two that most nearly line up. (0.25mm on the vernier scale)

4). To get the correct reading, simply add this found digit to your previous reading. (10mm + 6mm + 0.25mm= 16.25 mm)
4.Maintenance
Clean the surface of the vernier caliper with dry and clean cloth (or soaked with cleaning oil) and stock in a dry environment if it stands idle for a long time.
Micrometer Screw Gauge: The micrometer screw gauge is used for measuring the diameter of fine wires, the thickness of paper and similar small distances, a micrometer screw gauge (commonly shortened to micrometer) is used. It consists of a frame, an anvil, a thimble, a ratchet stop, screw, a spindle, a barrel and a lock nut. The method of operation is as follows-

The screw has a known pitch such as 0.5 mm. Pitch of the screw is the distance moved by the spindle per revolution. Hence in this case, for one revolution of the screw the spindle moves forward or backward 0.5 mm. This movement of the spindle is shown on an engraved linear millimeter scale on the sleeve. On the thimble there is a circular scale which is divided into 50 or 100 equal parts.
When the anvil and spindle end are brought in contact, the edge of the circular scale should be at the zero of the sleeve (linear scale) and the zero of the circular scale should be opposite to the datum line of the sleeve.

Zero error- Zero error occurs when your instrument has an incorrect reading when measuring something that should read zero. E.g- Your weighing scale has nothing on it, but it doesn't read zero. Instead, the scale reads a different mass although there is nothing on it.
Zero Error for Vernier caliper-
Positive zero error is when the jaws are closed and the zero on the vernier scale is to the right of the zero of the main scale.The measurement taken with this pair of vernier calipers will be MORE than the actual result. To get the correct value, the zero error must be subtracted from each reading. Eg: The zero error (0.03) is subtracted from the reading. The actual reading is thus (eg) 2.35-0.03cm= 2.32
Negative error is when the jaws and closed and the zero of the vernier scale is to the left or the zero of the main scale. The measurement taken with this pair if vernier calipers will be LESS than the actual value. To get the correct value, the numerical value of the zero error must be ADDED to each reading. Eg: The 4th line on the vernier scale is in line with the marking on the main scale. The zero error (0.10-0.04cm=0.06cm) is added to the rading. The actual reading is thus 2.35+0.06cm=2.41cm.
Negative error is when the jaws and closed and the zero of the vernier scale is to the left or the zero of the main scale. The measurement taken with this pair if vernier calipers will be LESS than the actual value. To get the correct value, the numerical value of the zero error must be ADDED to each reading. Eg: The 4th line on the vernier scale is in line with the marking on the main scale. The zero error (0.10-0.04cm=0.06cm) is added to the rading. The actual reading is thus 2.35+0.06cm=2.41cm.
Zero error for micrometer screw gauge-
When the anvil and spindle end are brought in contact, the edge of the circular scale should be at the zero of the sleeve (linear scale) and the zero of the circular scale should be opposite to the datum line of the sleeve. If the zero is not coinciding with the datum line, there will be a positive or negative zero error as shown in figure below.
Zero error in case of screw gaugeWhile taking a reading, the thimble is turned until the wire is held firmly between the anvil and the spindle.
The least count of the micrometer screw can be calculated using the formula given below:
Least count

= 0.01 mm
Learning to read the vernier caliper and micrometer screw gauge is not easy for me, and I always failed to understand how to read them and why I needed to read them as such. Hence, I failed my first pop quiz on Vernier caliper and micrometer screw gauge. However, with help from my teacher and friends, I gradually grasped the concept on how to use these instruments and how to correct zero error. These instruments may prove hard to learn at first, but if you persist you will eventually learn.

The least count of the micrometer screw can be calculated using the formula given below:
Least count
= 0.01 mm
Learning to read the vernier caliper and micrometer screw gauge is not easy for me, and I always failed to understand how to read them and why I needed to read them as such. Hence, I failed my first pop quiz on Vernier caliper and micrometer screw gauge. However, with help from my teacher and friends, I gradually grasped the concept on how to use these instruments and how to correct zero error. These instruments may prove hard to learn at first, but if you persist you will eventually learn.
No comments:
Post a Comment